
More people now live in flats without gardens, and even city-dwellers with gardens can find themselves enveloped by light pollution. So over recent years there has been increasing interest in star trackers, which are portable, compact mounts normally tracking in RA only that can be easily carried to friends’ gardens or even on overseas trips.
Sky-Watcher’s range of star trackers, called Star Adventurer, have been popular. The original Star Adventurer was released in 2014, running off an external 5V supply or four AA batteries, motorised and guiding in RA only. I bought one then and it still works well today. The 2i version followed in 2020, adding WiFi control so that the mount could be operated using a free Sky-Watcher app running on your phone or tablet.
While versions 1 and 2i tracked well once they were aiming at a target, some users struggled to find their targets in the first place – they wanted GoTo functionality in a Star Adventurer and that is exactly what the new Star Adventurer GTi now offers. The product was announced in April 2022, motorised and guiding in both RA and Dec axes. Samples were supplied to several YouTube influencers who reported their experience with the mount in glowing terms. I was keen to test a sample at the earliest opportunity but it was not until July 2022 that mounts actually started to be shipped. At the time of writing they remain in very short supply and I am grateful to Optical Vision for supplying me with a sample unit to review.


The mount is offered in two configurations: the mount head only, or the mount head plus tripod and tripod extension. I already own a tripod with a 3/8-inch central bolt on top, so I asked to review the mount head only.
The mount is delivered in a single compact box. Packed safely within are the mount head, counterweight shaft and counterweight, USB cable and a printed user manual. I screwed the head onto my tripod and was impressed by how stable everything seemed, much better than my original Star Adventurer on its separate wedge. The supplied single counterweight, weighing 2.26 kilograms, feels very heavy. Even right at the top of the shaft, it is too heavy to balance a light system such as a DSLR and a modest lens. I would have preferred to see two separate counterweights, perhaps one of a kilogram and the other 1.5 kilogram. That would offer greater flexibility.
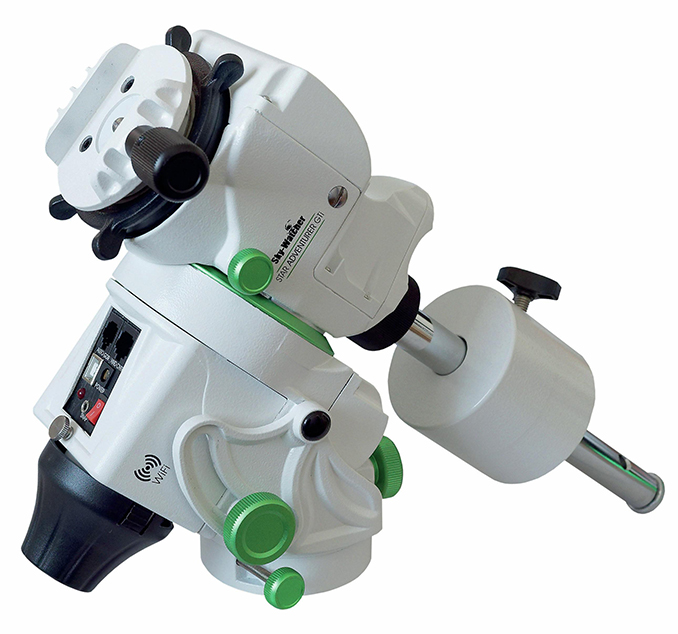
The mount usefully offers a choice of two holes into which the counterweight shaft can be screwed. For higher latitudes, say between 30 and 70 degrees that includes the UK, the shaft can go in the lower hole. At lower latitudes of, say, 0 to 30 degrees, there’s a risk that the counterweight might collide with the mount, so in such locations the upper hole should be used.

To power the mount, 12V of DC power is required. This can be supplied either by installing eight AA batteries inside the mount, or by an external 12V battery or 12V mains adaptor that can be plugged into the control panel. I don’t approve of single-use batteries and have had poor experience with cheap AA rechargeable batteries, so I used my 12V Tracer lithium polymer battery throughout my testing, which worked fine. Another reason to avoid using internal batteries is the poorly-designed thumbscrew that holds the cover for the battery compartment in place. When unscrewed, this thumbscrew detaches from the cover, which is an accident waiting to happen. I can see this screw being dropped and lost in the dark – it would be better to make the screw captive to the cover with a suitable washer.


Solar imaging with the Star Adventurer GTi
It was daytime but I was keen to use the mount straight away so I set up the tripod and mount head in my back garden to try some solar imaging. The base of the mount head has a useful bubble indicator to confirm that the tripod is level. I had to polar align the mount first, which was challenging given that it was the afternoon and so there was no chance of seeing Polaris through the polar-scope. I live in London at a latitude of about 51 degrees north, so I needed to point the mount towards true north (which I could do using a compass app on my phone) and then raise up the altitude of the mount to 51 degrees (which I could do by reference to the altitude scale on the mount).

I installed my Lunt 60 solarscope and Imaging Source mono camera in the Vixen clamp at the top of the mount and balanced everything in RA and Dec. This solarscope and camera weigh 3.4 kilograms together, so they are towards the top end of the five-kilogram stated maximum.
There is a choice of ways in which the mount can be controlled: WiFi via smart device, WiFi via notebook computer, by USB cable to notebook computer, or by using a hand controller. It’s a matter of personal choice which you use. The WiFi methods use the SynScan Pro app, available for free on Android, iOS or Windows. For this review I tried all the methods: using the app on an Android phone, using the app on an Ipad, using the app on a Windows 10 notebook, by USB cable to this notebook, and by using a SynScan hand controller that I already owned. Note that no hand controller is supplied with the Star Adventurer GTi – if you want one, they are available for purchase separately. All of the control methods worked successfully, so the flexibility of this mount is impressive.
I selected a solar-tracking rate and slewed the solarscope to point at the Sun. After capturing 1,000 frames, the Sun had hardly moved on my screen, so the daytime polar alignment and solar tracking had worked fine. I stacked my frames in AutoStakkert, applied wavelets in Registax and coloured my image orange in Photoshop. I was pleased that the final image clearly showed the more active period that the Sun has now entered.

Night-time imaging with the Star Adventurer GTi
After my solar imaging, I waited for nightfall to do some traditional astro-imaging. I replaced my Lunt 60 solarscope with a William Optics Star 71 telescope (a small refractor with a focal length of 350mm), matched with a manual filter-wheel and an Atik 460EX mono camera. Also attached were a 120mm focal-length guidescope and an Orion guide camera. The whole ensemble weighed 3.3 kilograms, similar to what had worked successfully with my solar imaging.
This time my polar alignment had to be accurate. The Star Adventurer GTi benefits from an illuminated polar-scope built into the mount. The brightness of the illumination can be adjusted in SynScan Pro or with a SynScan hand controller. Kneeling low down, I was able to match the position of Polaris in the polar-scope to where the SynScan Pro app told me it should be. I also own a PoleMaster camera system to achieve polar alignment, and having polar aligned with the polar-scope I then ran the PoleMaster routine that pleasingly advised me that my polar alignment was just about bang on.

In order to use the GoTo function, I first had to carry out a star alignment so that SynScan Pro knew which direction it was pointing in. I would normally choose a one-star alignment using a bright star close to my ultimate target, but for this review I chose a three-star alignment and aligned successfully to Arcturus, Vega and Altair. My imaging target for the night was going to be the Crescent Nebula in Cygnus, so I entered NGC 6888 into SynScan Pro and the mount slewed there. Starting up my imaging program with a hydrogenalpha filter, I was pleased to see the nebula in the centre of my screen – the GoTo had worked nicely. Having confirmed the focus in my imaging program, it was now time to set up the guiding. The mount has a traditional ST-4 port for a cable from the guide camera, so I followed this route. Users who want to control the mount via a standalone computer such as the popular ASIAIR will use the guiding capability of the ASIAIR rather than the ST-4 port, but there’s nothing wrong guiding with a cable to the ST-4 port and running a separate program such as PHD2 on your notebook.
I started up PHD2 and let it calibrate itself in the usual way before it started guiding. The quality of the guiding performance of my review unit was only moderate, with total RMS error of three or four arcseconds. In some periods everything seemed fine with only small adjustments made to RA and Dec, but there were other periods where large errors arose and the program took some time to get things back under control. I am always willing to admit to the possibility of user error, but there are also YouTube videos that report modest guiding performance for this mount, as well as others that report good performance with a total RMS error of less than one arcsecond. It would be possible to open up the unit and try to adjust the backlash in the gears to improve the guiding, but this would probably void your warranty.
I persevered with my imaging and captured 10 six-minute subs each of H-alpha and O-III, binned 1 × 1 at zero degrees Celsius. It was a balmy 24 degrees Celsius at night in London, so I couldn’t push the camera’s cooler much lower, which was unusual.
The next morning I studied my captures. Two of my H-alpha subs and two of my O-III subs had significant trailing and had to be discarded. I combined the remaining eight subs of each filter to produce my final image of the Crescent Nebula region.

Conclusions
The star-tracker concept has matured, with the Star Adventurer GTi introducing GoTo functionality into a light and compact system. The integrated wedge means that the mount is stable and the illuminated polar-scope allows accurate polar alignment.
There has been criticism that the five-kilogram maximum payload is no more than the Star Adventurers 1 and 2i, but I don’t agree with this criticism. Five kilograms is plenty for a small telescope with an astro-camera or a DSLR/ mirrorless body with a heavy lens, and that is the kind of payload that the GTi is intended for.
It’s important to have realistic expectations of the guiding performance out of the box. I found the guiding comparable to running an AZ-GTi mount in equatorial mode (described in the October 2018 issue of Astronomy Now). If you want much better guiding performance then either you should buy a more expensive mount or you should be prepared to tune the backlash out of the system.
Overall, the Star Adventurer GTi operated much in line with my expectations. It fills a gap in Sky-Watcher’s product range for a compact equatorial mount and I think it will be popular when the product is freely available.
At a glance
Weight of mount head: 2.6kg
Accessories supplied: one 2.26kg counterweight
Payload capacity: 5kg
Tracking: dual axis; lunar, solar or sidereal
Power: DC 12V, 8 AA batteries or external supply
Details: opticalvision.co.uk
Price: mount head only, £515; mount and tripod kit, £599